M3 - New Computer Set Up
PC INITIAL SET UP
TABLE OF CONTENTS
Document Purpose................................................................................. 2
Citrix Workspace Installation............................................................... 3
Import/Export/Scan Folder Set Up........................................................ 6
First Time Login Process...................................................................... 24
SCANNER SET UP
Scanner Installation Instructions......................................................... 8
Compatible Scanner List........................................................................ 9
Scanner Download Links...................................................................... 10
PRINTERS
Regular Printer Set Up....................................................................... 15
Check Printer Set Up 17“Document Purpose”
The
purpose of this document is to provide our customers with step by step
instructions to make their new, or refreshed
PC ready to run Accounting Core and set it
up so that they will be able to continue to do their job.
“Citrix Installation for Windows 10”
1. Installation:
****when you first log into https://clientportal.m3as.com you will be prompted to download Citrix again. Do not do this. Click here for instructions to bypass.
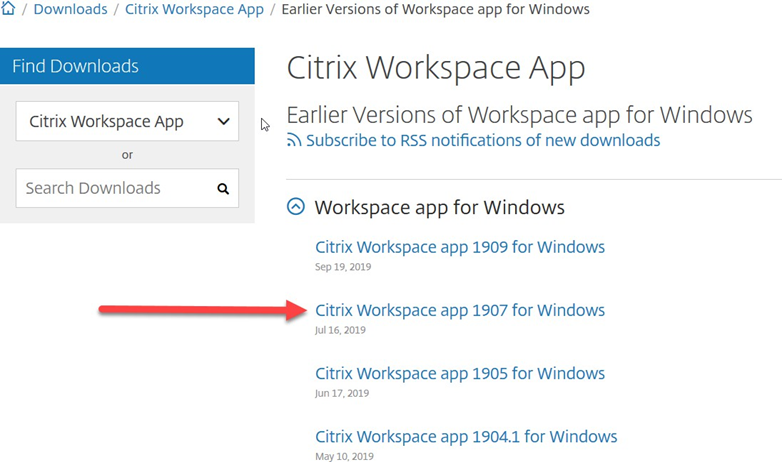
2. Download Citrix installation file from:
o Windows 10: https://www.citrix.com/downloads/workspace-app/legacy- workspace-app-for-windows/
o Click Citrix Workspace app 1907 for Windows
o This is the currently
supported version of Citrix for Accounting Core
3.
Click Download Citrix
workspace app for windows”. (Download
file to desktop)
4.
Right click on the file and select
“Run as administrator”
5. If you are using a Hilton or Marriott Computer, you will need to reach out to the corresponding support teams to get their admin credentials to complete the above step
6. Complete installation
o Note: Do not check the single sign on box during installation
o
A computer reboot
is recommended
8. Enter credentials
o If you are unable to log in using your M3 credentials please reach out to the technician that provided this document to you for assistance
9. Click on the Accounting Core Icon to launch the program
“Creating the Import/Export/Scan Folder”
1. Go to your C:\ and create
a folder named (Technician provided in the email). Below is how to create the
folder
2.
Right-click inside the file explorer
3.
Choose New
4.
Choose Folder
5. When you choose Folder,
shown here, a new folder
appears, with the name “new
folder” highlighted so you can type a new name
6. Right-click where you want a new folder to appear, choose
New, and select
Folder from the menu
7. Type a new name for the folder. (provided
above)
8. Now you will see the new folder
with the name you gave it that may vary depending on the user.
When you begin typing, Windows quickly erases the old name and fills in your new name. Once you are done typing the new name,
save the new name by either pressing Enter or clicking
somewhere away from the name you’ve just typed.
3. Choose New
4. Choose Folder
6. Right-click where you want a new folder to appear, choose New, and select Folder from the menu
9. If you enter the name in incorrectly and want to try again,
right-click the folder, choose Rename, and start over
a.
Certain symbols are banned from folder (and file) names,
but you never have
trouble when using plain old letters and numbers for names
b. If your right-click menu looks different than the one shown. There’s
nothing wrong; programs often add their own items to the right-click menus,
making the menu look different on different PCs
Scanner Installation Instructions
***If you do not scan invoices in AP or documentation to journal entries please skip to the next section.
***Simply plugging in the scanner will not install the scanner ina way that will allow it to work within Accounting Core. Please download the drivers form the respective sites below and install them before plugging in the scanner.
1. Below you will find the links to download the drivers for Windows 10 for each of the scanners on our compatible scanner list.
2. Click on the link, follow the screenshot to the download, and download the drivers.
3. Run the file that downloads. (if you are a Hilton, or Marriott you will need to reach out to their support technicians to have them install the drivers using their admin credentials)
4. Once you have installed the drivers for your scanner, plug in the USB and power and turn on the scanner.
5. Open Accounting Core and you will be able to scan.
a. If you experience any issues after following these instructions, please do not hesitate to contact tech support/or if you have an open case, contact that technician.
b. If you are not using one of the compatible scanners, please refer to page 4 of this document to help you set up the scan folder as you will need to scan to the folder then upload to Accounting Core from it to attach images.
***There may be scanners that
work for direct scan that are not on the compatible scanner list. You will need to search using www.google.com to find the
appropriate
drivers and install them to see if it will work or not.
M3 Compatible Scanner List
· Ambir DS820IX
· Ambir DS830IX
· Brother ADS-1500
· Brother ADS-2000 (make sure it is NOT the Brother ADS-2000e)
· Canon P-215II
· Canon DR-M160II
· HP Officejet 8710 Multifunctional
· HP Envy inspire 7900e Multifunctional
· Plustek Smartoffice PS 186
· Panasonic KV-S1026C
· Samsung M2885FW (added April 2018—includes printing capabilities)
The above scanners should be available to purchase at any local office supply store.
*As changes in Windows occur, some scanner models may become non-compliant with Accounting Core. We will continue to monitor and update this list when we learn of any models becoming obsolete.
Regular Printer
Set Up
1. To set up your regular, non-check printer in accounting core follow the below steps.
2. Click on the “start menu” at the bottom left of your screen
3. Start typing “Control Panel” and hit the “enter key” when it shows in the menu
4.
Click on “Devices
and Printers”
5. Find your printer, right click on it and choose “Set as Default Printer”
6. Click the “X” in the upper right to close the window
7.
Log into Accounting Core and the printer will now be set as your regular
printer
in Accounting Core
Check Printer
Set up
***If you do not print checks please stop here as you do not need to set up a check printer
1. When in Accounting Core
· Click the menu Maintenance
· Click the sub menu Companies
· Select the Enterprise (very top level/management company)
·
If you cannot
select the enterprise level, i.e. it is greyed
out, select the property level
2. Select the Enterprise (very top level/management company)
·
If you cannot
select the enterprise level, i.e. it is greyed
out, select the property level
3. Click edit in the top left
4. Click the printer button in the bottom right
o If you do not have this button stop and contact tech support/or if you have open case, contact that technician. They will need to assist you from here.
o
If there is a printer
listed at the property and it is not
yours, please stop and contact your technician
o
If
you are on the enterprise level and you see your printer, but it isnot
showing in check writer please stop and contact your technician
5. Click the add button
6. Use the drop down and select your printer
o Click ok
o
Wait a few seconds for the window
to disappear and re-appear. It may say “not responding” but that is okay
7. Use the next drop down and select the font GNUMICR
8. The boxes at the bottom with numbers in them should have 65 66, 67, and 68
9. Click ok
10. Click save in the upper left
***If at any point you feel that you need assistance, please do not hesitate to contact the technician you are working with
***Right after you have selected your
check printer and clicked ok, before you select the font wait for a few seconds because the window will disappear
and re-appear while it is attempting to communicate
with the printers. It may say “not
responding”, it is not frozen, it is working in the back ground to communicate
with your printer.
Please wait until
the not responding message disappears to continue
First Time Login Process
1.
Go to https://clientportal.m3as.com and input your credentials, then click
“Login”
3. Click “Detect receiver”
Related Articles
How do I find my Computer Name?
NOTE: Excerpts below taken from the MS Knowledge Base article: https://support.microsoft.com/en-us/office/do-you-need-help-locating-your-computer-name-00384381-8aa9-4398-b81b-475f09fed618 Find your computer name in Windows 10/Windows 11 Open the ...Setup New Laptop (Corporate Issued Only)
To setup your laptop, please make sure you have received ALL components and have some time to spend about 15 - 30 minutes on the phone with the IT Tech. Call Cybertek support at 1-888-464-5144 Or...you can email support at ...Set up devices for Microsoft 365
Please refer to this link to the Microsoft support page for information on setting up your mobile device to access McKibbon O365 resources (specifically Outlook emails). These instructions should also be followed for any brand accounts that are using ...NEW - M3 Accounting Core Login Page
Effective @ November 30th, 2022 https://cloud.m3as.comEnd of Month Report Tutorial - Tableau (New as of December 2025)